

How to Scale a Furniture Floor Plan for a Room That Actually Works
Scale your furniture on a floor plan by measuring the room, rounding to the nearest half foot, choosing a standard drawing scale, and testing arrangements with scale furniture templates or scale-aware software before you buy a single piece. That’s the whole method in one sentence, and it works whether you’re planning a Plano starter home or a downtown Dallas apartment.
The Center for Architecture has taught this exact process to students for years: measure, round, redraw at a fixed scale, then test with paper cutouts. Two scales cover almost every residential project you’ll run into. Here’s the short version of what’s ahead:
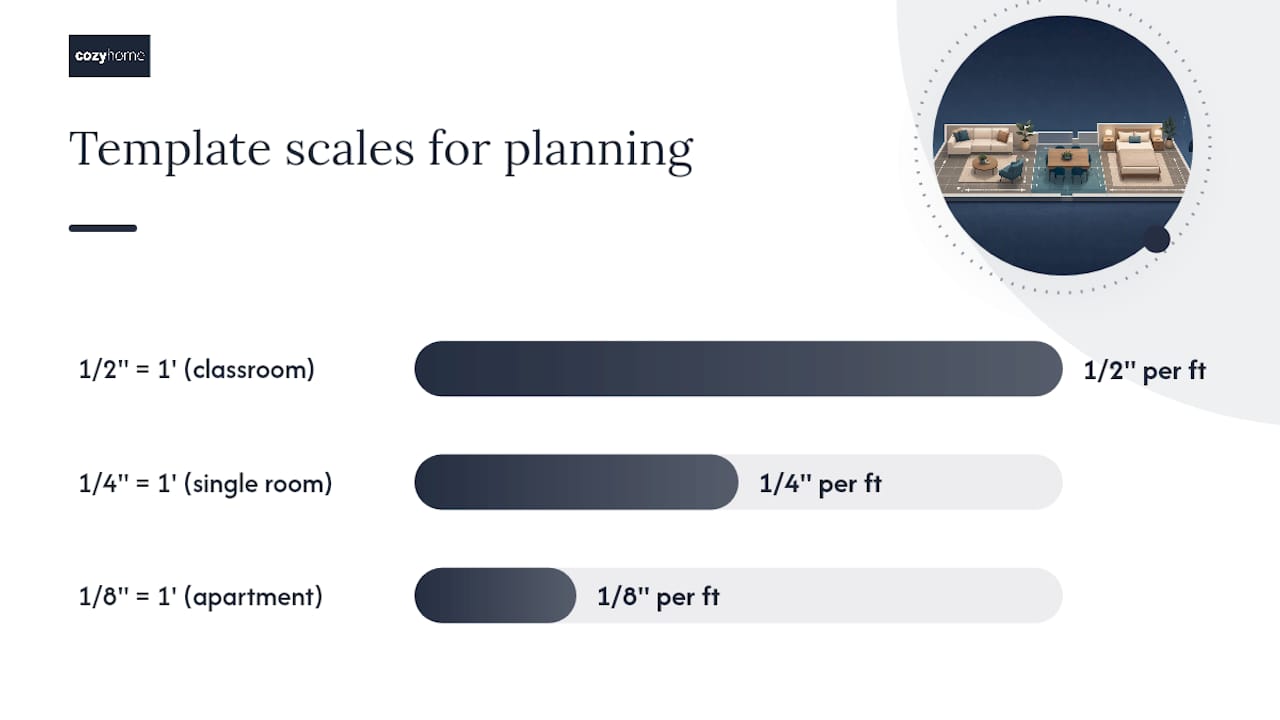
- Measure the room and choose between 1/4" = 1’ or 1/8" = 1’ scale.
- Redraw the plan by hand or import it into software that locks in your dimensions.
- Cut out scaled furniture templates and test layouts before ordering anything.
- Verify every print or export at 100% with a scale ruler.
- Bring your finished plan to a showroom like cozyhome furniture for sizing help.
Key Takeaways
Scaling furniture on a floor plan works when you measure accurately, commit to one drawing scale, and physically test layouts before you buy.
| Point | Details |
|---|---|
| Measure first, round second | Record every wall, door, and window, then round to the nearest half foot for a manageable drawing. |
| Pick one scale and stick with it | Use 1/4" = 1’-0" for single rooms or 1/8" = 1’-0" for multi-room and open-concept layouts. |
| Test with paper before buying | Cut scale furniture templates and slide them around the plan to catch clearance and door-swing problems early. |
| Verify every digital export | Check one known dimension, print at 100%, and confirm with a scale ruler before trusting a software plan. |
| Get sizing confirmed locally | Bring a finished scale plan to cozyhome furniture’s Plano showroom for fit guidance and made-to-order sizing. |
Table of Contents
- What You Need for Scale Furniture Floor Plan Rendering
- How Do You Measure a Room and Draw It to Scale?
- How Do You Make Scale Furniture Templates?
- Which Software Keeps Furniture Layouts Accurate to Scale?
- Common Furniture Dimensions and Clearance Space to Plan Around
- How Do You Catch Scale Errors Before You Order Furniture?
- Accounting for Wall Thickness, Doors, and Windows
- Adjusting Scale Plans for Multi-Room and Open-Concept Layouts
- Marking Outlets, Switches, and Fixtures on Your Plan
- Get Help Sizing Furniture to Your Scaled Plan
- Sources
- FAQ
What You Need for Scale Furniture Floor Plan Rendering
You don’t need architecture software to get this right. A tape measure, a sheet of graph or scale paper, an architect’s scale ruler, a pencil, scissors, and access to a printer will get most homeowners through the entire process by hand.
Paper cutouts win when you’re testing a quick idea, working with one or two rooms, or you just want to see if a sectional fits before you drive to a showroom. Scale-aware software earns its keep on bigger jobs: multi-room remodels, open-concept layouts, or anything you need to share with a spouse, contractor, or sales associate as a clean printed sheet.
The Center for Architecture’s classroom method leans on manual cutouts for a reason. Physically sliding a paper sofa around a paper room forces you to notice tight corners and blocked doorways in a way that clicking and dragging on a screen sometimes doesn’t.
Pro Tip: Do the paper version first, even if you plan to finish in software. It takes 20 minutes and it’ll catch layout problems before you’ve invested an hour building a digital model.
How Do You Measure a Room and Draw It to Scale?
Getting an accurate scale floor plan starts with the tape measure, not the software. Follow this order and you’ll avoid the most common measuring mistakes.
- Measure every wall length, then measure the width and height of each window and door opening.
- Note the location of fixed elements: closets, columns, radiators, built-in shelving.
- Round every dimension to the nearest half foot, a rounding rule the Center for Architecture recommends specifically because it keeps hand-drawn plans manageable without meaningfully hurting accuracy.
- Pick your scale. A defined scale is what turns a rough sketch into a usable planning document, so this step matters more than it looks.
For a single room, 1/4" = 1’-0" (also written 1:48) gives you enough resolution to place furniture precisely. For a whole floor or multiple connected rooms on one sheet, 1/8" = 1’-0" (1:96) keeps the drawing a manageable size.
From here you have two paths. Redraw the room by hand on scale grid paper using an architect’s scale ruler to plot each wall at the correct length. Or snap a photo or scan of a rough sketch and trace it in software that lets you set and export a fixed scale, a workflow Cedreo is built specifically to support.
Whichever path you choose, verify before you trust the drawing. Measure one known dimension, like a doorway width, against the finished plan to catch what’s sometimes called scale drift in digital imports. Then print or export at 100% and check it with your architect’s scale ruler. Skip this step and every furniture template you cut afterward will be wrong.
Pro Tip: Keep your original tape measure numbers in a notebook, not just on the drawing. If a digital import shifts the scale later, you’ll have the raw data to fix it fast.
How Do You Make Scale Furniture Templates?
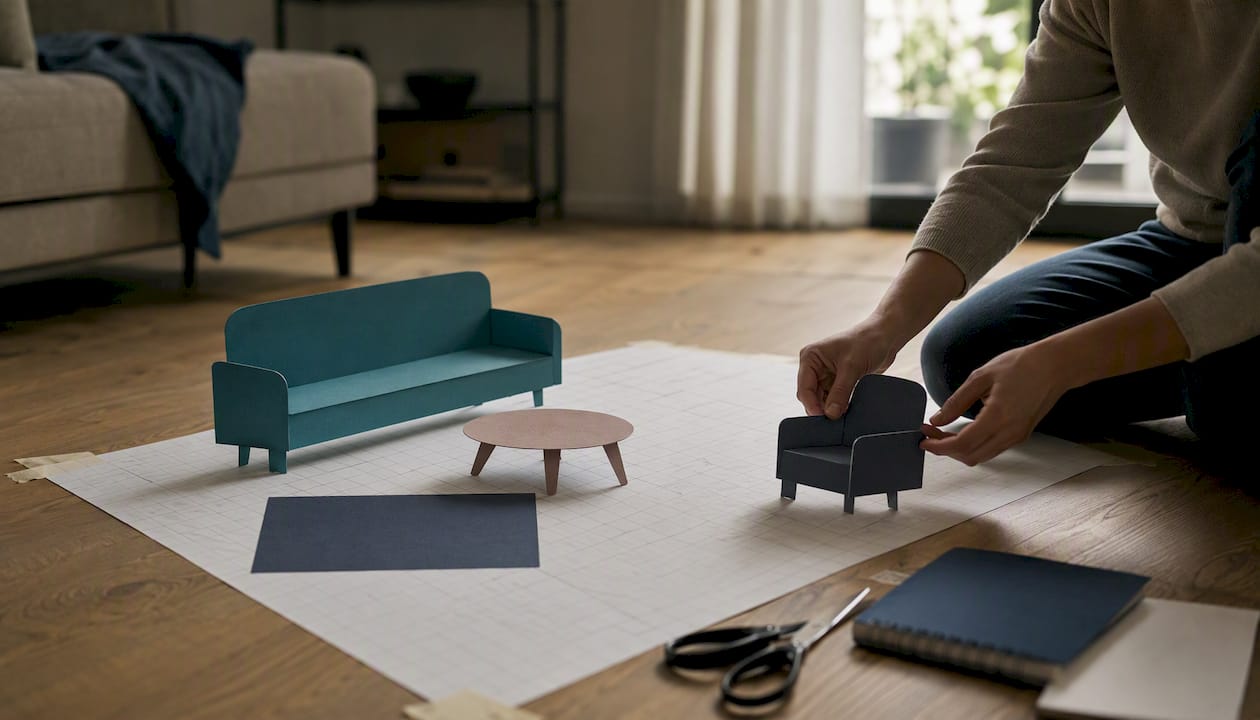
Paper furniture cutouts are the fastest way to test a layout without moving a single real piece. The math is simpler than it looks once you’ve done it once.
- Measure your furniture, or use standard dimension references if you’re shopping and don’t own the piece yet.
- Draw an overhead outline of each piece at the same scale as your floor plan.
- Cut out each shape and label it with the piece name and its real-world dimensions.
- Lay the cutouts on your scaled plan and slide them into different arrangements before committing to one.
Here’s the math on a real example. An 84-inch sofa is 7 feet long. At 1/4" = 1’-0" scale, that’s 7 times 1/4 inch, or 1 and 3/4 inches on paper. Measure that out with your scale ruler, draw the rectangle, and cut.
Do this for every major piece: sofa, coffee table, dining table, bed, dresser. The Center for Architecture’s method uses this exact approach at 1/2" = 1’ scale for classroom-sized rooms, and it scales down cleanly to 1/4" or 1/8" for full apartments and houses.
Pro Tip: Mark door swing arcs and walking clearances directly on your cutouts or plan in pencil. A sofa that fits the wall space but blocks a door swing is still the wrong sofa for that spot.
Which Software Keeps Furniture Layouts Accurate to Scale?
Paper cutouts work great for one room. Once you’re planning a full floor or you want a shareable printed sheet, scale-aware software removes the manual conversion math entirely.
- Cedreo lets you import an existing plan in PDF, PNG, JPEG, or DWG format, trace or adjust the walls, then add doors, windows, and furniture symbols before exporting at your chosen scale.
- SmartDraw ships with professional floor plan templates and extensive furniture symbol libraries, plus the flexibility to change your drawing scale mid-project and print to scale when you’re done.
- Homestyler auto-converts uploaded DWG, PDF, or JPG plans into editable 3D rooms with drag-and-drop furniture placement.
- Nim takes a finished 2D plan, hand-drawn or scanned, and generates a photorealistic 3D render populated with furniture, though output quality depends heavily on how clean and well-labeled your input plan is.
A reliable workflow looks like this: import or trace your plan, set the scale, add doors and windows, drop in scaled furniture symbols, then export a printable sheet. Before you trust any export, check one known dimension against your tape measure numbers, confirm the paper size and orientation, and export at 100% rather than “fit to page.” Print it and check with a scale ruler one more time.
Reach for a photorealistic render when you need to visualize finishes, fabric colors, or lighting for a big purchase decision. A flat 2D scale plan is all you need if you’re just confirming whether a piece physically fits.
Common Furniture Dimensions and Clearance Space to Plan Around
Knowing rough furniture sizes before you measure saves you a second trip with the tape measure. Treat these as starting points, then confirm exact dimensions on the specific piece you’re considering.
- Three-seat sofas typically run 78 to 90 inches long.
- Standard dining tables for six run about 60 to 72 inches long and 36 to 42 inches wide.
- Queen beds measure 60 by 80 inches; king beds run 76 by 80 inches.
- Nightstands and end tables are usually 18 to 24 inches square.
Clearance matters as much as the furniture’s footprint. Leave at least 30 inches of walking clearance in main traffic paths, 36 inches behind dining chairs for someone to pull out and stand, and a minimum 42 inches around any appliance that needs a full door swing, such as a dishwasher or oven.
To use these numbers on your scaled plan, convert them the same way you converted the sofa example: multiply the inches by your scale factor, then draw the resulting clearance zone as a dashed outline around each piece. If a walkway measures less than that on paper, it’ll measure less than that in real life too. Our guide to furniture scale and proportion walks through more sizing examples if you want to go deeper before you shop.
How Do You Catch Scale Errors Before You Order Furniture?
A scale error you catch on paper costs you five minutes. The same error caught after a sofa arrives costs you a return fee and a missed delivery window.
- Confirm one known dimension, like a door or window opening, against your original tape measure numbers.
- Check that wall thickness is represented, not just the open interior space, since interior walls typically run 4 to 6 inches thick.
- Verify door swing directions and window sill heights against the actual room.
- Re-check any oddly shaped room or space with a column, bay window, or angled wall against your original measurements.
If a digital import looks stretched or compressed, the scale probably shifted during the scan or upload. Reset the scale using one known wall length, not the software’s default. Rounding errors compound in irregular rooms, so measure those spaces in smaller segments rather than one long diagonal guess.
If your printed plan still doesn’t match the room after a re-check, it’s worth a second measuring pass rather than guessing. Our furniture shopping mistakes guide covers the ordering errors that trace straight back to a scale that was never quite right.
Accounting for Wall Thickness, Doors, and Windows
A floor plan drawn from interior wall measurements alone will always read a little larger than the real room, because interior partition walls typically run 4 to 6 inches thick and exterior walls run thicker still. When you draw your scaled plan, represent walls as filled bands at their actual thickness rather than single lines, especially at doorways and shared walls between rooms.
Door and window placement affects furniture placement more than most people expect going in. A door that swings inward needs a clear arc, usually matching the door’s width, where no furniture can sit. Mark that arc on your plan in pencil before you place anything nearby. Windows matter for two reasons: sill height determines whether furniture can sit beneath them, and the window’s swing or slide direction (if it opens) needs its own clearance just like a door.
Pay attention to which way each door swings into a room. A door swinging into a small bedroom can eliminate an entire corner as usable furniture space, something you’d never catch by just measuring the wall lengths. Note swing direction as an arrow on your drawing when you first record wall measurements, not as an afterthought later.
For homes with pocket doors, sliding closet doors, or barn-style doors, the swing-arc problem disappears, and you can plan furniture right up to the door’s edge on the open side. If you’re weighing an open floor plan against a more closed layout for a home office or flex space, the space-planning guidance at One Day Doors & Closets covers how partition choices change what a room can hold.
Adjusting Scale Plans for Multi-Room and Open-Concept Layouts
Open-concept living rooms, kitchens, and dining areas that flow into one another need a slightly different approach than a single closed room. Instead of drawing each space on its own sheet, draw the full connected area as one continuous plan at a consistent scale, usually 1/8" = 1’-0" for anything larger than about 400 square feet, since 1/4" scale drawings get unwieldy past that size.
Mark the boundary between functional zones with a light dashed line rather than a wall, even though no physical wall exists. This helps you keep furniture groupings visually organized: a sofa and coffee table anchoring the living zone, a rug defining the dining zone, without confusing which pieces belong to which activity when you’re testing arrangements with cutouts.
Sightlines matter more in open layouts than in closed rooms. Walk your actual space and note where you can see from the kitchen into the living area, then make sure your furniture plan doesn’t block that view with a tall bookcase or an oversized sectional back. A scaled plan won’t show you sightline height, only footprint, so this is one spot where walking the real room still beats the paper drawing.
For homes with multiple connected rooms feeding off a hallway, draw the hallway itself to scale too. Hallways under 42 inches wide limit which furniture pieces you can move through them later, which matters if you’re planning to bring in a large sectional or dining table down the road.
Marking Outlets, Switches, and Fixtures on Your Plan
Electrical outlets and light switches decide more furniture placement than most first-time planners realize. A sofa placed over the only outlet in a living room means lamps, chargers, and media consoles all need extension cords snaking across the floor, which is both a tripping hazard and a look nobody wants.
Walk the room and mark every outlet, switch, and hardwired fixture location on your floor plan before you finalize furniture placement. Use a small circle for outlets, a short line for switches, and note ceiling fixture locations if you’re planning furniture that shouldn’t block a pendant light or ceiling fan, like a tall bookcase.
Pay particular attention to floor outlets in larger rooms and any dedicated circuits for wall-mounted televisions or under-cabinet lighting. If you’re planning a media console or a bed with a headboard against a wall, check that a switch isn’t hidden behind where the piece will sit. This sounds minor until you’re the one reaching behind a fully assembled bed frame to find a light switch.
For dining rooms, note where any dimmer switch sits relative to the table, since you’ll want it reachable without walking around seated guests. Kitchen islands and peninsulas need outlet locations marked especially carefully, since code-required outlet spacing along countertops directly affects where stools or a table extension can go. Once outlets and switches are marked, your scale furniture templates will show you immediately which arrangements keep everything both usable and out of the way.
Why Measured Drawings and Cutouts Still Matter
Every ordering mistake I’ve seen traces back to skipping the tape measure and trusting a guess instead. A measured drawing with real cutouts catches the wrong sofa before it’s on a truck.
That’s why cozyhome furniture’s in-store staff walk customers through fit and configuration in person, not after delivery. Verify your dimensions before you buy. It’s the one step that actually prevents returns.
Get Help Sizing Furniture to Your Scaled Plan
A floor plan tells you what will fit. Turning that plan into the right sofa, in the right fabric, at the right price is where cozyhome furniture comes in. Our Plano showroom staff spend their days doing exactly this kind of fit and configuration work with homeowners across Plano, Frisco, Allen, and McKinney, so you’re not translating inches to furniture decisions alone.
Bring your printed scale plan, or even just clear photos of your room with a tape measure in frame, and our team will help translate those dimensions into real furniture recommendations. Because every cozyhome piece is made to order across 700+ fabric and leather options, we can also adjust depth, arm width, or seat height when a standard size comes close but doesn’t quite match your scaled cutout.
Start by browsing a few options built for real living rooms, like the Excelsior sofa or the Quinn sofa, then bring your measurements into the showroom or book a visit to confirm fit before you order.
Sources
- Redesign Your Room with a Floor Plan and Furniture to Scale - Center for Architecture
- Floor plan examples with scale - Plansremodel
- Easily Draw Floor Plans to Scale | Cedreo
- SmartDraw floor plan creator - SmartDraw
- Architectural plan to render - Nim
FAQ
What Is the Easiest Scale for a Bedroom or Living Room?
1/4" = 1’-0" (1:48) works best for a single room since it gives enough resolution to place furniture precisely without an oversized sheet of paper.
Do I Need Special Software to Scale a Floor Plan?
No. A tape measure, graph paper, and an architect’s scale ruler are enough to draw an accurate plan by hand, though software like Cedreo or SmartDraw speeds up multi-room projects.
How Do I Know If My Digital Floor Plan Import Is Accurate?
Measure one known dimension, like a doorway, with a physical tape measure and compare it to the imported plan; a mismatch means the scale shifted during scanning.
Can I Test Furniture Arrangements Without Buying Anything?
Yes. Cut paper templates to the same scale as your floor plan, label each with its real dimensions, and slide them around to test layouts before you shop.
Where Can I Get Help Making Sure Furniture Fits My Space?
Bring your scaled plan or room photos to cozyhome furniture’s Plano showroom, where staff help translate your measurements into sizing and configuration recommendations.